Monday, November 30, 2009

Drawing Tutorial - Hair - Stages 4-9

Sorry, don't know what happened to the images on these posts...I will try and fix them soon...

Continued!


STAGE 4: STILL laying down strokes in the direction of hairs. I continue to go back to the beginning and darken things up while making the lines longer and longer to shape the style.


STAGE 5: Keep molding the style...continuing to keep to the darkest areas. Avoid highlights, but make the strokes into the highlights very random and jagged. Also: Turn the paper as needed to make the direction of the hairs easier to draw.


STAGE 6: Finish up the style. Continuously going back and darkening things up in layers.


STAGE 7: Here I take my tortillon, dirty or clean, doesn't matter. And go over the entire style in the direction of the hairs. Avoid crossing the strokes as much as possible to avoid a smudged look. Smooth everything out.


STAGE 8:Pick out highlights. I use my beloved "Hold-tu" putty and shape it into a sharp wedge. Then "draw" (drag) lines, uneven to each other, into the highlights so they blend into the pencil strokes and brighten the areas a bit. You could also do this with a sharp white eraser I'm sure, but the hold-tu works best for me.


STAGE 9: Time to push the darks! Go back over all dark areas with 3B again, or use something darker if you like. Add stray hairs around edges of curls and outside of the "border" of the head and also around the face. I avoided the face ones a bit since I haven't put the skins tones down yet. Give the illusion of individual hairs all over the head by drawing them at various pressures into highlighted areas. Continue to go back and push the darks until the very end of the drawing. You will add a lot more stray hairs at the end, when everything is done with skin, background etc...as a last step.


Stay tuned for more of this portrait's stages. This concludes the hair tutorial. Thanks for the visit!

Tuesday, November 24, 2009

Drawing Tutorial - Hair - Stages 1 to 3

This is a family requested self portrait that I turned into a hair tutorial for an art forum that I'm a moderator on. It's from a few years ago, but I thought I'd share it in stages during a few blog posts. As with all art, this is not a set in stone way to do things, but just the way I do it (in an accelerated tutorial type fashion, normally I'd spend days working on hair while this was done in an evening) and if used should be tweeked to fit your style. Enjoy.


STAGE 1: The outline. This is what it looks like when I've completed the sketch and then cleaned up all the yucky stray sketch lines and eraser lines. It looks dark here because I sketch very dark, going over and over my lines. But I then lighten it up by rolling blu-tack over
the entire sketch, which you'll see in stage 2.You'll see that with the hair I block in some of the highlighted areas, but I don't stay a slave to the picture...sometimes you can make it look much better!


STAGE 2: I am using a 3B 0.5 mechanical pencil through this entire tutorial, to keep it simple. I start laying down
strokes in the dark areas, following the direction of the hairs. I know usually these tutorials say, "Don't draw individual hairs, just block in color." Well...I draw hairs....it works for me!


STAGE 3: Continuing to lay down strokes in dark areas. It's important to be careful with the direction of the pencil strokes. If you go too fast and they go all over
the place, you end up with straw, instead of hair.


I'll stop there for this post. Three more stages in a few days. Thanks for stopping by!

Sunday, October 4, 2009

More kitty pics


Because who can resist right.


Some new additions to the Thompson Clan

Friday night we surprised our two kids by taking them to a lady's home who fosters kitties for the Humane Society. This is her blog about her foster kitties.

She had five amazing little babies to choose from and it was so difficult to make our decision. In the end we chose the ones that sucked up the most and that my son took a shine to right away.
They are two orange tabby brothers, that are not only hilariously playful, but very good little snuggle bugs too. They have incorporated themselves into our household like they were meant to be here all along. Meet Max:


And Sam:

Monday, September 14, 2009

Some quick pics of our camping trip and what I've been up to.

Oh my goodness, its been too long since I posted. I apologize to my followers. I have had a big surge of custom orders and I'm getting ready for the Fort Lewis Holiday Bazaar coming up the beginning of November. Plus family just always takes priority for me. This weekend we went camping on the amazing Olympic Peninsula. We camped at Lake Quinault and hiked all around the rain forest there. Saw some lovely waterfalls and walked through what felt like landscape of the dinosaur age. I couldn't get enough of taking pictures and was wishing I had my DSLR that I'm supposed to be getting for Christmas. Christmas!!! That's so far away haha. We also swung through Forks and Port Angeles, which was fun and interesting being a fan of the Twilight books. Here's a couple of pictures of our trip.


Monday, August 3, 2009

Easy Peezy Strawberry Cake

I was craving a cake with fresh strawberries so we picked up a bushel (box, container whatever!)over the weekend. I couldn't find a recipe that was what I wanted so I winged it. I am not a domestic goddess by any means, so this is the simplest and most direct way I could get what I was craving.

I used:

One box of yellow cake.

One box of strawberries, chopped and sliced.

Two packages of dream whip.

I followed the directions on the cake box for two 8 inch round cakes and baked them. I cooled them in the refrigerator while I chopped the strawberries. I chopped about 3/4ths of the strawberries and cut the rest into thin slices. I made sure there was no mushy bits, I hate those.

Then I whipped up the first package of dream whip and mixed in the chopped strawberries. Pulled the bottom layer of cake out of the fridge and put it on the cake stand. Spread the strawberry/dream whip mix on top. There was a bit left over that I saved for the kids to eat as a snack the next day. Whipped up the second package of dream whip and stuck it in the freezer for a little bit because it was melting too fast to spread (it was 86 in my kitchen last night). Then I put the top layer of cake on top of the strawberry/dream whip layer. Spread the plain dream whip over entire cake. Top with sliced strawberries. And voila! Easy Strawberry Cake that was DELICIOUS and so perfect for summer. Store in the fridge or the dream whip will melt. And considering my skills in the kitchen, me saying it was easy is a big deal!

If you try this by my recommendation, I'd love to hear how you like it. My family couldn't get enough.

Note: I learned today from a friend that a bushel is 9 gallons HAHA, no I didn't buy 9 gallons, just a little box like you get at the produce store.

Sunday, August 2, 2009

More crochet fun - Soldier Boy

I had so much fun making this little guy. My soldier boy is about 3 1/2 inches high. He is a first prototype, so I see many more variations in my future.

PS, for those that are not familiar with the Army uniform, that's a beret on his head, not a huge toupee. ;)


Friday, July 31, 2009

Having some crochet fun


I've had this little guy brewing in my head for months. Last night I really wanted to make something fun, so I decided to give him a go. (Yes, he's a boy, my son said so. "It's okay for jellyfish boys to be pink.")
I had originally thought he'd be two colors, but while watching TV at the same I forgot to change colors at the right time. haha. Oh well, he's cute this way too. I'll try a multi color one next time.
My son has named him "Jelly the Jellyfish" and has claimed him as his. What do you think?

Monday, July 27, 2009

A recent happy purchase

Once in a while I go looking for something on Etsy, and I just don't find exactly what I want. So I find someone who makes it close, and ask them if they can customize it for me. Recently I went looking for "boo boo bags" or cold packs, or whatever you want to call them. They are the fabric sewn pillows filled with flaxseed that you can put in the freezer or the microwave depending on what you need. There were lots of these in various forms, but I couldn't find any I liked with lavendar in them. For some reason my kids love these things for bed time. I had a pack of them I got from MommysLittleHelper last year, but she since closed down that shop to focus on her other shop, 1Maddieandme. I checked her shop, but she didn't have any up. So I found EnchantedDandelions had some nice big ones in daisy and round shapes in super cute fabrics. So I messaged her and asked if she could add lavendar for me. She was very accomodating and said it would be no problem. Yay! She let me pick my fabrics (see pictures, these are the exact ones I ordered) and I had them a week later. And we adore them! They are so cute and soft and perfect for bedtime in the summer. My kids each take one to bed with them to help them stay cool while trying to fall asleep. Here in WA state we have no A/C and bedtime is a little difficult. Not to mention every time there is a bump or even hurt feelings these calm them right down in a jiffy. Today I discovered I love them for myself too. As I sit here sweltering in the heat I decided to grab one from the freezer and see if it'd help. I sat it on my neck, and let me tell you, I cooled right down! Thank you, EnchantedDandelions for a wonderful purchase and Etsy buying experience!

Wednesday, June 24, 2009

Eye on Artisans - The Chameleon's Attic / Dancing Bears Tea House

This week's featured artist is another wonderful member of the Homefront team. Patricia has two shops. The Chameleon's Attic, an eclectic mix of handmade envelopes, toothbrush rugs, and much more; and Dancing Bears Tea House where her husband and herself create tasty tea blends. Her spunky sense of humor, helpful advice, and constant support of myself and the other members of the team has earned her a top rating in my book. Add her beautiful crafted and creative products and you've got someone you've got to get to know better in your sights. Enough from me, let's hear from her:


What are your favorite materials to use?

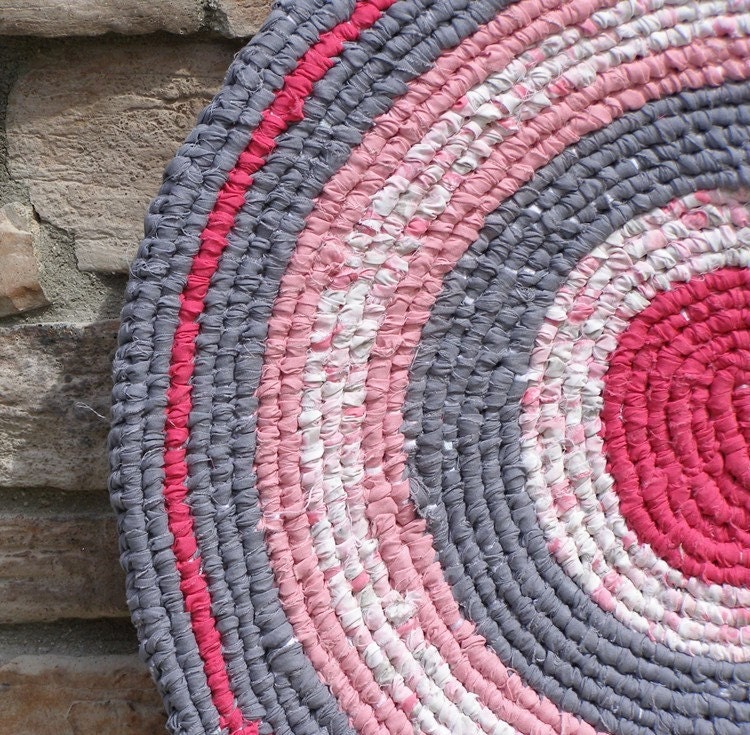
I'm a very textural person, I like how things feel. When I'm searching for fabrics to use in my rugs I have to touch everything. I love the feel of soft cool cottons and they make a beautiful rug. Sheets are so fun to work with in a rag rug; you never know what the prints will translate to until you start to work the rug. Textured fabrics like loose weaves, wools and denim are a great way to add dimension to the rugs.So I like all those wrapped up in recycled fabrics. I like to work with recycled fabrics because there is so much out there. I never have a problem finding what I need in colors and textures. Not only do I end up with a great creation but, I'm also repurposing an item that may end up in a landfill.Trust me there is a lot of great fabric out there to be repurposed.


Which crafting tool could you not live without and why?


I could never be with out my locker hook, it travels with me. It's the most multi-use tool I have. It looks like a crochet hook with a needle eye on the other end and longer. I was driving across Kansas and stopped at a quilting shop. They had this great locker hook rug. I stayed for a couple of hours and the wonderful ladies taught me how to make their beautiful rugs. These rugs are not anything like the rugs I make but they were beautiful and I was fascinated with them. I picked up a few of the locker hooks and brought them home with me. Now I use them with my toothbrush rugs and so many other things. I'm still mastering the locker hook rug and hope to add them to The Chameleons attic soon.Oh, and they would make a great tool in mummification to remove brains!


You use a lot of recycled materials, where do you get them all?


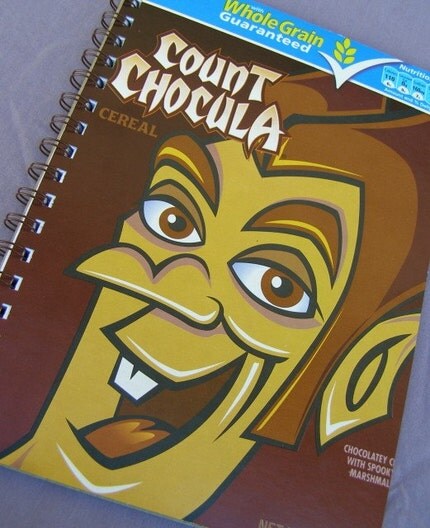
I love working with recycled materials. Most of the materials I use in my rugs are sheets. From time to time I use jeans, cotton shirts, and a lot of flannel, a few curtains, and some table linens. Most of my fabrics come donated to me by friends and family. They have learned nothing is to be tossed out before I get to rummage. Last week my mom even mailed me sheets she wanted to get rid of. She used them to wrap a breakable vintage vase she sent. I got the vase and a sheet! I've already made it into a new rug. My husband is in on the search as well. The guys at work bring him all their old jeans and t-shirts. I wish they would bring me their old camo blouses; wouldn't that make a great rug? When I'm short on materials I scavenge the thrift shops. I wait until they do a big holiday sale and hit 4 or 5 shops in one day and I'm set for a few months.My paper selections started just for fun. I needed some envelopes for a special event at school and I wanted them to be very science like. I had this out of date science encyclopedia set that was falling apart. So I made the pages into envelopes. It was so fun and they were a huge hit. So I added them to the shop. Now I search libraries for books they are tossing out due to damage and I repurpose them in to new novelty paper products.The notebooks are all made from post consumer products. I gather cereal boxes, cake boxes, what ever I can find to make my covers with. I also use the covers from some of the books I make envelopes from. Again, most of these come from family and friends. The holiday notebooks are primarily made from used greeting cards I've received in the mail. I did get a lot of unused cards dropped off to me after the holiday’s season last year. LOL I'll use what I need for my Christmas card list and make a few notebooks too.


What got you into making tea?


I am a huge fan of iced teas and breakfast teas. My husband is a true Southerner and drinks sweet tea and after a year in Okinawa he developed an appreciation for Oolong and green teas. Together we have very specific tea pallets. The problem is we don't like the same things. We started blending our own teas to suite our tastes. Then they became a family project for Christmas gifts (we've tried to make a move to handmade gifts). Eventually it was my husband who pushed to open our tea shop, Dancing Bears Tea House. We would love to have a Brick and Mortar tea house but, we just didn’t know if our blends were good enough. Etsy gives us an outlet to try the blends and get feedback. It's something we love to do together. It's time we spend chatting over making a new blend, doing taste tests. I think my husband pretends he is a mad scientist and I am his side kick.


Are there any other artisans you really admire right now?


I honestly admire every artist on Etsy. I think anyone who takes a chance and puts the creations from their own hands out there for people to view is admirable. It takes a lot of courage to put yourself out there like that.There are several artisans I admire but, I have to really say the person I value most for their artistic ability is my mother. She can do anything in any medium and create something wonderful. I grew up with her sculptures and paintings all over our house and she made sure I had every opportunity to try new mediums or take classes when she did. We've learned needlepoint, cross stitch, macramé, pottery and even photography together. My mom's artwork is what I want displayed in my house.


Anything else you'd like to say?


Do you remember the commercials that came out a few years ago with the kids dressed in bland colors and bland expressions, reciting pages from dictionaries and financial pages? They talked about broadening your child’s education with art. Well...something like that. Anyway that’s how I feel about crafting. If I didn't have that outlet I would be bland and colorless. I want to be full of color and expression.

Creating anything with your hands engages all of your mind body and heart.


Thank you, Patricia, for allowing us this look into you as an artist and your lovely creations.


Thursday, June 18, 2009

The Yarn Chick - Now offering patterns!

I'm excited to announce that this week I started offering patterns of my creations in my shop. The first two patterns I'm selling are of my amigurumi apple and pear. Available only in my Etsy shop, they can be purchased seperately, or as a set to save a dollar. They are nice easy patterns, great for someone who is at least an advanced beginner and is wanting to try their first amigurumi plushie. Super cute as a teacher appreciation gift too.

Friday, June 12, 2009

Eye on Artisans - Levans Photography

A new member joined the Homefront team (Etsy street team of military spouses) recently and I've had the pleasure of chatting with her in our forum.

Her photography really caught my eye, and since she's new to Etsy, I thought I'd share her with you. She thankfully agreed.

Born in England, and married to an American soldier, they are currently living in Germany. This gives her access to some subject matter some people can only dream of seeing in real life. She has a way of capturing everyday objects in a unique and beautiful way that is wonderfully appealing.


Where do you derive inspiration from?

In terms of photographers my biggest inspiration in style has come William Eggleston (the father of colour photography) and Martin Parr (great photographer but a complete ---hole to talk to) but generally I just see stuff. My husband always comments on how I'm off taking a photo of a piece of dirt or something, when ever we're travelling I'm always way behind everyone else taking photos. Right now I'm trying to do some conceptual stuff like with the camera's on the park bench, and my inspiration for this comes from seeing the amazing work produced by other photographers and wanting to have a go.


Do you take your camera everywhere?


I do sometimes, but I hate leaving it in the car all the time, especially since american cars can get targetted over here. If we go somewhere for the day or anywhere travelling it goes everywhere with me, but not to and from base. Saying this I have got home before and immediately gone out with the camera to photograph something I noticed on my drive and wished I had my camera with me.


What is your favoite technique or style?

I'm not sure I have a favourite but generally I like to shot things straight on so the subject matter is flat to the camera. Placing my camera on the ground or very low to it can make for an insteresting angle, and I love straight lines. Also I tend to like my subject matter off centre, not big on symmetry in my photos. But saying all this it doesn't apply to everything, some stuff you see is just perfect from where you're standing.


Does your life as a military spouse affect your life as a photographer?


Completely!!! I was working in a high school as a photography technician the year before I got married and shooting sports photography for a company on weekends. Then we pcs'd to Germany and I got a job working at Chilis and my photography was kind of put on hold. I would still take photos when travelling but that was it. So last year I saved up for my Nikon D300 (it's so pretty) and this year I bought my new laptop. My new years resolution was to start a photography business, and hopefully slowly I'm getting there. If I can get it up and running it's the perfect business for me to move with as I can do it from home, and bartending can supplliment it for the moment. As any military wife knows there are times when you just get left in the background, not intentionally but you're the support system, going wherever they go and having a career of your own is hard. Overseas job opportunities are limited so you have to work with what's available, but hopefully this (etsy, 1000markets etc ...) will allow me to follow my dreams wherever uncle sam takes us.


Is there another artisan of any craft on Etsy that you admire?


You know I admire so many of the different crafts ... I now want to learn to sew and have a go at making soap. Both of these could turn into epic failers but at least I'll have tried. There's so much creativity on here, everywhere you look someone has done something to make you go wow. From crocheted hats to graphics to the other photographers out there. It's slowly becoming my new shopping addiction, and it's all unique and different.


Anything else you'd like to talk about?


I love the old cliche of "one moment in time" that a single shot can suggest one thing whilst a frame seconds later another. I love that photography allows me to explore the world and notice things I would never have seen before. And I love that you could ask 10 people to photograph the same object and no 2 photos would be the same. So I guess you could say that my photographs are a glimpse into my world, kinda like you're seeing exactly what i'm seeing at that moment in time.


Thank you Laura for allowing me this interview.

Visit her Etsy store for more beautiful fine art photography.


Levans Photography


Thursday, June 11, 2009

Cro-Shay - A Brief History

How can one truly understand their skill unless they know its history? I asked myself this today and realized I didn’t know the history of my own obsession…crochet. So I have done some research to satisfy my own curiosity, and thought I’d share with you what I found. This only covers a very small amount of what I read and accumulated in my mind, but I think they are the most interesting facts about this craft.


According to Wikipedia, the term crochet derives from the French term croc or croche meaning hook. Crocheting, often confused with knitting, is similar to that craft in that it consists of pulling loops through other loops to create a fabric out of yarn or thread. Instead of knitting needles, a crochet hook is used, and one loop is active at a time, rather than many like in knitting.Although there are many theories about where crochet started, there is no real evidence of its practice before the 1800s in Europe. The earliest written reference to the craft is in The Memoirs of a Highland Lady by Elizabeth Grant in which shepherds knitting is mentioned. That work was written in 1812. Other theories and references have been found, but no concrete evidence of its invention. Many believe it was probably invented much earlier, but using a finger bent like a hook instead of an actual tool. Because of the crafts’ simplicity of its basics, theorists think it must have been used much earlier than we think.


During the 1800s, hooks ranged from bent needles in a cork handle, a very primitive and inexpensive version used by poor Irish lace workers during the Great Irish Famine; to more expensively crafted silver, brass, steel, bone and ivory hooks that seemed to be more decoration for the lady’s hands than a useful tool. Nowadays there are several different types of crochet hooks in many different sizes, depending on what you are creating. An uncountable number of different stitches and patterns can be created using crochet.


Fashions created in crochet have changed numerous times since its discovery. Queen Victoria even became fascinated by it, starting out purchasing many pieces, and then ultimately learning to crochet herself. Crochet can be used for so many different styles; it has become a very versatile craft to learn. From brightly colored yarns made into dishcloths, scarves, stuffed toys, hats and more to bright white thread looped into beautifully ornate doilies and wraps, everyone is sure to find a crocheted item that suits them.

Monday, June 8, 2009

Pairs of pears

I recently made a crocheted pear and its my new favorite desk buddy. I made it after making apples for my son's teachers. Aren't they cute? They are available for custom order in my Etsy shop.

Monday, March 9, 2009

Crabby finds for my crabby mood

Yep, I'm a grouch today. So here are some great crabby items to go with my mood. But I would love these on a good mood day as well!


Colorful and fun Leather Crab Keychain by leatherprince:


Organic Hermit Crab Onesie by circularaccessories:


Clever Hermit crab knit pattern by hansigurumi:


Cute fleece crab baby hat by ButterflyBlueDesigns: